Showing posts with label lighting. Show all posts

Sunday, 28 February 2016

Kitchen Update #2

We're back! It doesn't feel like it's been two months since the last post.  Time just flies by when you're busy!  Since the last post we have now completed our home assessment with CAS and we are now on the "approved and waiting" adoption list.  The phone could ring at any moment with news of a match for us.  In fact, every time it does ring I'm convinced that it's them calling (but it's usually one of our mom's calling, which is just as nice!).

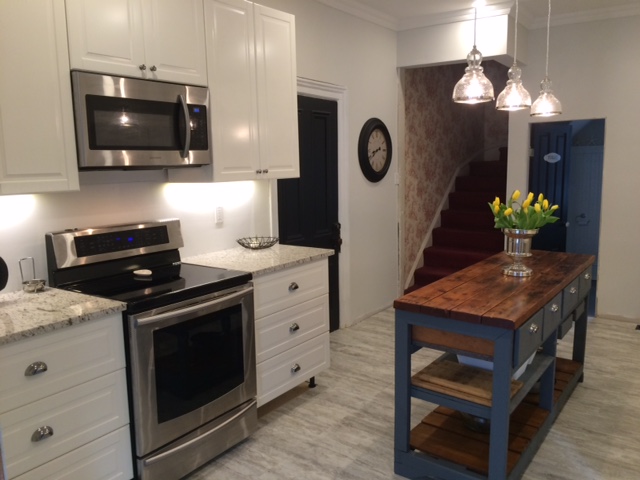
Things in the kitchen are progressing really nicely.  Before going back to work in January we were able to get the subfloor installed, the priming and painting done and all of the cabinets in place.


Jeremy's parents came down for a weekend and were such a big help with that part!  While I was making trips to and from Ikea to order and exchange missing parts, they were busy putting the cabinets together and hanging them.  We love our Ikea kitchen cabinets, and if we ever remodel another kitchen, we would definitely use them again.


The Ikea cabinets work on a rail system that you secure to the wall first.  For most homes, hanging the rail would be a simple step.  In our 130 year old home, it was quite the challenge finding studs through the many layers of plaster and drywall.  Thankfully, Jeremy's dad is a very patient man and an excellent problem solver!  It only took two days to have the rails secured and the cabinets in place.

By that point we were tired of microwave dinners and ordering pizza so we started moving things back into the kitchen and using it again.  Our electricians returned to finalize the outlets for the appliances and our under cabinet lighting.  We purchased our new appliances and were really excited to get them in and start cooking again!


Once all of the cabinets were up, we went to a granite yard just outside of Peterborough to look for our countertops.  This place was amazing!  Most of their slabs and remnants were outside and we were able to just walk around and pick which ones we liked.  Although I really wanted quartz, we ended up choosing a granite remnant that they had called "Kasimir White" which is from a quarry in India.  Because it was a remnant, the price couldn't be beat!  They came to measure within a few days and installed the counters a week later.


We also ordered our flooring at this point, which took many weeks to arrive.  While we were waiting for the flooring to come in, we took a break from everything.  We had been working for quite a few weeks and a break was definitely needed.  

Last week our flooring finally arrived!  We went with a new product called luxury vinyl tile.  It's completely water resistant, almost indestructible and it clicks together like laminate flooring.  We installed it ourselves over the course of two days.  


We still have a lot of finishing touches left to do - filler, trim and end pieces on the cabinets, kickplates, baseboards and door casings, and the backsplash.  I'm hoping it will all be done by March Break, or Easter weekend at the latest. It will be so great to finally say that our kitchen is done! 


Monday, 18 August 2014

Two Rooms Finished!

We've spent a great deal of time working outside of the house and getting the downstairs washroom finished, but we found that there were times that we were waiting for things to dry or there was only room for one person in the bathroom so we started the master bedroom closet. This was also prompted by the inconvenience of living out of a combination of a closet in another bedroom and laundry baskets!

We started things by mudding the holes in the walls (I am not sure what they used this room for, but I pulled about 16 nails from the wall). We also repaired the three holes the electricians made while updating the electrical. From there Aaron primed the room and painted the first coat of paint. The colour we chose for the room was Snappy Dresser by Para which we had mixed in a Benjamin Moore paint to save some money. This room was lacking the large baseboards that were found in the rest of the house so we decided to follow the template we used in the downstairs bathroom and add eight inch pine boards with moulding. I have to say they turned out amazing!! From there Aaron finished off the painting. 


One of the most difficult parts of this renovation has definitely been the layout. Although it is a large room we wanted a lot of furniture in it. We spent the last couple weeks changing the room around and trying out furniture in different locations and sequences to find one that gave us the functionality and aesthetics we were looking for. 

We painted all the doors black as we loved the finish when we did it in our old house. As Aaron has posted before it's some of the smaller details that make a room great, but they are the most time consuming. We spent more time then either of us planned trying to perfect the door knobs with crystal ones that matched the other doors in the house. After spray painting them black and cutting the rods and a few trips to the hardware store for small parts, I think we finally achieved the look we were going for. 


We were very lucky that we were able to use most of our existing furniture in this space, like the dressers. In the old house we had Ikea bookshelves for our sweaters. They worked, but we always found it difficult to keep the things tidy looking. After looking our furniture over we decided to use a shelf we had with cubbies in it. When we put in place it wasn't high enough so we went to Target and found one that added the perfect height to the shelf (and was on sale). We drilled a couple of holes in the bottom and added some dowels for support and a bracket to hold it together for the perfect centre shelf. From there we added three hanging bars for our clothes, giving us far more hanging than our previous closet. 


We added a little art above the dressers. Who can say they have art, a window, a skylight and a balcony in their closet!!


Looking at our laundry hamper and laundry baskets we felt we needed something more functional for our dirty clothes. Finding I was already missing our large front load washing machine from the old house, we needed something that would show it was time to put a load in. We went to a few stores and found the perfect laundry hamper / laundry basket at Walmart. We bought three so we can sort our laundry and know when there is a load ready to go in. 


The room originally had a very ugly track style light in it. While the electrician was here we had him change this to two sconces on either side of the French doors, giving us much needed extra lighting. 


The last touch we added was a belt and tie holder. I think these were the perfect finish for the closet, allowing us to see all the items we own. For the belt holder we cut a four inch board, sprayed it black and added several hooks to hang the belts from. For the ties, again we cut a four inch board and sprayed it black then hammered nails into it so we could see all the ties we owned. 


And finally after less then two months of living in our amazing new home we have two rooms finished and a good chunk of gardens looking like us!!!!

Feel free to add a comment below, we love reading your thoughts and feedback!


Sunday, 6 July 2014

Whistle While You Work

We've been hard at work this week and things are really starting to look different around the house.  I feel like I have a million incomplete projects on the go right now, but I think it will stay like that until the electricians are done.  They started on Tuesday and have most of the main floor rewired and they're now making their way through the upper floor.  We're really impressed with the job they've been doing.  They're keeping the house really clean and have only had to cut three holes so far.  That's a big difference from one of the other electricians we had quote the job, who wanted to take all of the ceilings down. It will feel so great to be able to move all of our furniture back in and have an organized garage!


I was so happy to see the light fixture in the living room go up.  Painting it black completely changed the look of it and it makes the space feel less formal and more like us.

Yesterday afternoon we were finally able to pick up our new dining room furniture.  What a  great Kijiji purchase!


Now we just need to recover the chairs, find a chandelier, remove the wallpaper, paint the wainscoting, hang drapes, rip out the carpet, install new crown moulding, find lamps for the buffet, hang artwork...and the list goes on.

Although we've been mostly working outside, we have started one project in the house.  The first pieces of wallpaper were torn down last night in the main floor bathroom. We decided that this would be a great room to start in because it's small and we can complete it fairly quickly.


 We have a great plan for this room, which I will share in the next post.  Hopefully everything goes smoothly and we have have an updated bathroom to reveal soon.  But for now, it's back to removing wallpaper.

Sunday, 8 June 2014

Let There Be Light!

With just two weeks left until we can start moving into our new home, we have been busy with packing, and picking up more new furniture and light fixtures.  Because of all of the renovations that need to happen, we're on a pretty tight budget when it comes to furnishing the house.  We figure we'd rather put extra money into the finishings (like heated marble floors in the bathroom...ooohhh) and save some cash right now by finding as much second hand furniture and light fixtures as possible.

Now that garage sale season is in full swing, we've been out bright and early for the last few Saturday mornings, looking for any pieces that will work in our new rooms.  We know exactly how we want each of our rooms to look (check out my Pinterest boards for each room!) so we've been pretty picky when it comes to buying other people's junk.  Some of the pieces we've bought won't be forever pieces, but will hold us over until we can afford the ones we really want.

In the foyer, we are planning on hanging a large glass apothecary light fixture like the ones pictured below.

Photos courtesy of Pinterest

We'll hang matching ones in the upper landing and hallway to really make the space flow.  The only problem is that the one we want for the foyer comes with a $400 price tag, and we will need three more for the upstairs hall! That's not in the budget right now, so we picked up this brass beauty at a yard sale last weekend for $5.


Although it's not exactly what we want, it will work for a few years until we can actually afford the apothecary fixtures.  It's hard to tell in the pictures, but the glass panes are all bevelled, which will create some great reflections on the foyer walls.  A coat of black spray paint will really change the look of it!

In the living room, we've been looking online and in lighting stores for a fixture similar to the one below.

Photo courtesy of Pinterest

At 15' by 22', the living room is a massive space that will require a massive light fixture.  I haven't been able to find this exact fixture, but we did find a few that were similar.  Most of them were in the $600-$900 range, and a few were higher.  That won't work for us, so we found this fixture on Kijiji a few days ago for $90!


It's hard to tell in the picture, but this fixture is huge!  I'm going to spray it all black, and the glass needs a really good cleaning but when we're done with it, I think it will give us the same look at a far more reasonable price.

After the paperwork was signed for the sale of our current house, Jeremy and I looked at each other and both said that we shouldn't have sold the fixture in the library.


It's a knock-off of Restoration Hardware's Foucault Orb Chandelier, which sells for over $600 at RH.  We purchased this one at one of our favourite shops on Port Perry's main street a few years ago, for around $300, and we have loved it since we hung it up.  We didn't think we'd ever find one again, but last week we spotted this one on Kijiji.


Other than the finish, it's exactly the same as our current one!  With the ceilings in the new house being considerably higher, we need the longer chain that this one has.  With a coat of spray paint, it will look exactly the same as the one that we have loved so much in this house.  We figure we will hang it on the landing until we can afford the apothecary lights, then move it into one of the bedrooms.

And finally, we spotted this lamp at a garage sale last week and thought that it had some great bones.


We don't know where in the house it will go, but with a fresh coat of paint, it will look great on a desk or side table.  At $5, we couldn't leave it behind!

With the exception of the dining room, we now have new fixtures for the entire main floor of the house (the kitchen has a ceiling fan that we will paint...with no A/C, it will be needed in there!).  I'm feeling really good about what we have found so far, and it's all been within our budget.  I'm hoping to get them all painted this week, so stay tuned for before and after pictures!