Showing posts with label bathroom. Show all posts

Saturday, 16 August 2014

Bathroom Reveal

I am so excited to be writing this post, because it means that we finally have one room done! Well...for the most part, that is!

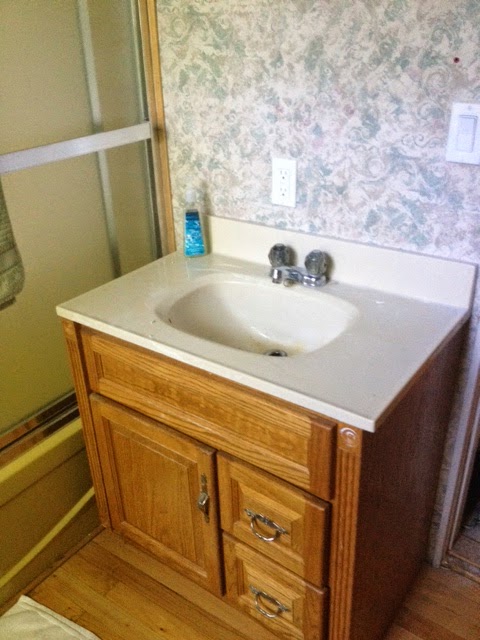
Before I share our new and improved main floor bathroom, let's take a look at where we came from.  When we moved in, this room had wallpaper on the walls, the ceiling, and the door.


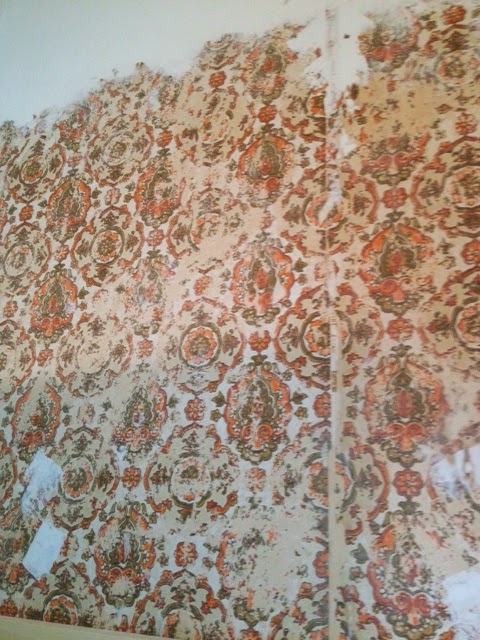
We started this reno about five weeks ago.  At first we planned on just stripping the wallpaper, painting the walls, and putting in a new toilet and vanity.  We figured that would only take a few days.  Then, we found this:


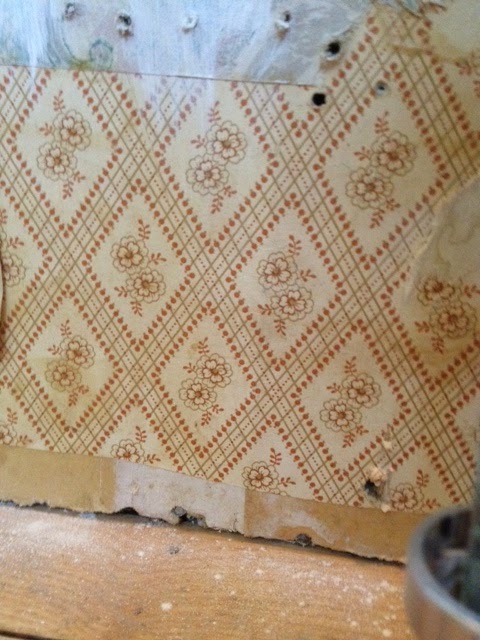
There were eight layers in total.  That's a lot of time spent stripping wallpaper, and repairing all of the damage!  Our electrician also had to cut some holes and take out a panel above the shower, which set us back a few days.

We also hit a few other unexpected bumps.  When we removed the vanity we discovered that the floor underneath it wasn't in the best shape, so this meant adding more to the project (hello, floor paint!).  There were also no shut off valves for the sink or toilet so there was some plumbing involved as well.

Once the bead board started going up though, we could tell that we were in for a major change.


We really wanted to make the trim in this room match the original, so we used 8" pine boards around the base and 4" pine boards above the bead board.  With the addition of some chair rail for some extra added detail, they really do look like the original trim in the house!

And now that everything has been primed and painted, we have our bathroom back.


It's so much brighter and more welcoming that it was before.  We still have many accessories to add in, but we plan on taking our time and finding ones that we love and that really fit the space.  We are also still working on the door.  Jeremy has been busy stripping off many layers of paint (and wallpaper!), and we hope to have it painted black and hung back up tomorrow.


Source list:
Paint
Walls and Ceiling: Benjamin Moore "Revere Pewter"
Trim and Bead Board: Benjamin Moore "Dove White"
Floor: Benjamin Moore "Asphalt"

Fixtures
Toilet: Home Depot "Glacier Bay"
Vanity, Faucet and Light: Canadian Tire
Medicine Cabinet: Garage Sale

Accessories
Blind: BouClair
Shower Curtain, Bath Mat and Hand Towels: Target
TP Holder: Home Depot
Iron Floor Grate: Lowes


Feel free to leave your thoughts in the comment box below.  We have changed our settings so that anyone can comment now (click on "anonymous" in the drop down menu below, but remember to add your name in your comment so we know who it is from!).


Sunday, 10 August 2014

Lessons Learned: Lesson #2

I was hoping to write a "bathroom reveal" post today, but we hit a snag in the progress of the bathroom last night.  After assembling the new vanity that we had purchased (it was worse than putting together a piece of IKEA furniture!) we went to put it into place only to discover that it's too tall and the electrical outlet will have to be moved.  Unfortunately that means the beadboard will have to come off and we will have some more drywall to patch before we can put it all back together.  So no bathroom reveal today.

And that brings me to lesson #2.  When we started this bathroom reno (just a few days before our wedding, what were we thinking?) we thought it would take just a few days.  We purchased the new fixtures, started ripping wallpaper, and thought we could have it all back together in about three days.  It's now been five weeks.  Yes, we took some time in there to get married and go on a honeymoon, but one thing we have definitely learned is that it will always take longer than expected.  Whether it's because we find eight layers of wallpaper to strip, or because an outlet needs to be moved, or the floor needs to be painted, we have learned that in a 130 year old house you can't set timelines.  The house will dictate how long each of our projects will take, not us.  The good thing is that we're in no rush.  We're not doing this because we want to flip this house and sell it in a year.  We love this house and plan on being here for many, many years to come.

Last week I mentioned that we had a visit from the great-great nephew of Samuel Jeffrey.  While we were talking with him, he mentioned that there was a plaque in downtown Port Perry that marks the spot where the Courtice and Jeffrey Harness Factory was located.  Thomas Courtice was the man who built our house, and his business partner and son in law Samuel Jeffrey later purchased it from him.

The plaque is located at the entrance to Petite Images Dollhouse Shop on Queen St. in Port Perry

Queen Street, before and after the 1884 fire - you can see the T. Courtice building on the left side

Above photos courtesy of Heritage Scugog
Another interesting fact that we learned is that Samuel Jeffrey was the first person to own a car in Port Perry.  It's pretty cool to think that we park in the same driveway that also had our town's first car parked in it!


Sunday, 3 August 2014

Working Inside and Out

It's been another busy week around the house.  Although we've had a lot of rain this week, we still managed to get lots accomplished in the gardens.  Both sides of the walkway are now clear and we've been working on the garden in front of the house.  There were a lot of large, overgrown stumps and shrubs that had to be removed and the vines that were growing up the house had taken over most of the garden as well.


Once all of the overgrowth was cleared out, we discovered some beautiful blue hydrangeas and a few small azaleas that hadn't even been visible.  I can't wait to see how they look next spring now that they have some room to breathe and grow.


Earlier this week I also cleared out the gardens in the driveway.  It looks so much cleaner now.


We haven't spent as much time working in the bathroom as I was hoping.  With a second bathroom in the house, it's just not as much of a priority as the outside is right now. Jeremy finished all of the sanding yesterday, and I'm now working on priming the entire room.  It will hopefully be painted soon so we can get the new fixtures installed.


We had a few unexpected visitors this week.

On Wednesday I put a few old trellises on the curb, figuring that somebody would stop and take them.  A few hours later there was a man knocking on the door to ask about them.  He introduced himself as the great great nephew of Samuel Jeffrey, a former resident and namesake of our house.  He shared a little bit about his family and his great great uncle.  It was definitely a cool surprise!

We also had another visitor in the night.  I woke up at 2:30 the other night to a bat flying above us.  Freaky!  Although we (and by we, I mean Jeremy...I had taken cover in another room!) weren't able to get him out of the house that night, we were successful when he made an appearance the following evening.  I love bats, just not in our bedroom!  We figure he found his way from the attic and into our bedroom through one of the holes the electrician made in our closet.  Needless to say, every hole in the house has now been covered up!

After a month of waiting, our hot tub is finally hooked up and running!  We were able to go in it last night for the first time, and it felt great after a day of working in yard.  It was so nice to relax after all of the hard work we've done this week.


Sunday, 20 July 2014

Bathroom "Pin"spiration

While we're taking a break to recover from a few busy weeks, I thought I would take a moment to share a few inspiration photos from Pinterest.

Once we made the decision to install beadboard, the rest of the plans fell into place.  Our colour scheme will be white, gray, teal and a few hints of yellow to hopefully make the yellow tub seem less intrusive.


All photos courtesy of Pinterest

The room currently has some poorly installed hardwood floors - not original to the house and they look horrible compared to the original ones.  I know some people will hate this idea...but we are going to...paint them!  Yes, we are going to paint hardwood. I've been reading up on painted floors and painted wood is actually historically accurate to the time of our house, so no need to be upset!

We still have to figure out the panel to cover the front of the tub as well as a beadboard panel above the tub which will provide us with access to the plumbing to the upstairs bathroom.  We'll need to get into there again when we renovate the second floor bathroom.

Hopefully I'll have some reveal photos to share with you soon!


Sunday, 13 July 2014

Bathroom Sneak Peek

I mentioned in my last post that we were starting to reno the main floor bathroom.  Although we haven't gone as far as removing the tub, it has still turned out to be a fairly big project.  It's not finished yet, but I thought I would give you a sneak peek of what we've been up to.

This room was most likely redone in early 90's and had harvest gold fixtures with pastel pink and blue wallpaper (matching the wallpaper in the kitchen).  All of the walls and even the ceiling were wallpapered.  We're not sure about the future of this room.  If we ever add an addition off the back of the house, we would love to relocate the bathroom and make this space part of the kitchen.  For that reason we have decided to keep the tub for now.  It's old, but in great shape and it doesn't make sense to rip it out.  We have plans to cover the front panel, but I'll share more about that in another post.


When we started removing the wallpaper, we realized that it was going to be more work than we had anticipated.  We have now found eight different patterns of wallpaper in the room!  Some were like cardboard.  Others had been covered with adhesive and drywall compound.  It was definitely like taking a trip back in time!


After finding so many layers (including 6 layers on the ceiling!) we realized that by installing beadboard 3/4 of the way up the wall, we could reduce the amount of paper to strip down.  We love the look of beadboard and it is historically accurate to the time of our house, so it seemed like a great option.

We originally bought 4x8 sheets of beadboard, thinking that it would be a quick install.  But, after taking a closer look at some of the intricate cuts we would have to do under the stairs and around the window, we opted to buy the tongue and groove pine panels instead.  They have been much easier to work with and were still fairly quick to install.

At some point the original mouldings were removed from this room, so we opted to add in larger baseboards and capping on top of the beadboard.  We went with 8" pine boards around the bottom and 4" boards for the capping.  We still have the final mouldings to add in, then the whole room will be primed and painted.


I can't wait to get everything painted and get the new toilet and vanity installed, but for now we have decided to take a break to recover from our wedding.  It was a busy week, doing all of the final wedding preparation while starting this project.  We were hoping to have it finished before the wedding but we just got too busy.  Hopefully after some relaxing time, we'll be back in full gear for the remainder of the summer.

Sunday, 25 May 2014

Bathroom Inspiration

One of the first major renovations that we plan on doing in the house is the main bath.  There are a few things that we love about the current bathroom, but most of it is just hideous!


We love:

We are fortunate that the bathroom is a great size.  This means that we don't have to steal space from any of the other rooms to enlarge it.  At 10 feet wide by 8 feet deep, we are certain that we can fit all of our must haves into this space.  We also love the claw foot tub.  It needs respraying, and is currently painted red on the outside, but with a little bit of work, we will get it looking amazing again!

We hope to change:

That floor - what were they thinking???  It matches the pastel wallpaper so well!  And then the red sink and tub.  WOW.  It's all gotta go!  The built in vanity and cupboard are great for storage, but they block the door from opening all the way, and we will need that space to relocate the tub, so they will be coming out. We might be able to relocate them to the garage or shed.  And finally, the real show stopper in this bathroom is the mirrored wall behind the bathtub.  Some might consider it romantic...but we just think it's odd.  Do you really want to stare at your own reflection as you bathe?

So here's our plan.  Jeremy has been working hard on creating floor plans for each of the rooms to help us figure out where things can go.


A shower stall and vanity will go where the tub is currently located, and the tub will go across from the door.  The only thing that will really stay the same is the toilet.  We'll keep everything light and airy with a white, cream and grey colour scheme.  Marble floors, a marble vanity top and marble subway tile in the shower will give the room a traditional feel to match the style of the house, while a modern glass shower stall will keep it from feeling too formal and stuffy.  We'll have the tub sprayed white, and paint the walls a soft taupe or cream colour.  Chrome sconces above the vanity and a matching chandelier should finish the room off perfectly.  The first picture below is the look we are going for. We don't love the mirrors, but the rest of it is perfect.


(above pictures courtesy of Pinterest)

So that's the plan for our first major reno.  We are hoping to begin gutting the bathroom in the fall and have everything done by Christmas.  Thankfully there is a second full bathroom in the house, so once we have it spruced up, we can take our time and make this one amazing!